Understanding Patellar Tendonitis
Patellar tendonitis is an inflammation or degeneration of the patellar tendon, which connects your kneecap (patella) to your shinbone (tibia). This tendon plays a crucial role in straightening your knee, absorbing impact, and enabling activities like jumping, running, and climbing stairs. Repetitive stress on the tendon, often seen in athletes involved in sports with frequent jumping (basketball, volleyball) or quick directional changes, can lead to micro-tears and inflammation, causing pain just below the kneecap.
While often called “tendonitis,” the condition can sometimes involve more degenerative changes, referred to as “tendinopathy.” Regardless of the precise pathology, the rehabilitation approach generally follows similar principles focused on strengthening and gradual loading.
Why Home Rehab is Crucial (and Its Limitations)
Implementing a structured home rehabilitation program is vital for addressing the underlying issues contributing to patellar tendonitis. It empowers you to take an active role in your recovery, building strength, improving flexibility, and managing pain on a daily basis. Consistent effort at home is often the cornerstone of successful long-term recovery.
The Importance of Professional Diagnosis
Before embarking on any home rehabilitation program, it is crucial to receive an accurate diagnosis from a healthcare professional, such as a doctor, physical therapist, or sports medicine specialist. They can rule out other conditions with similar symptoms, assess the severity of your injury, and provide personalized advice. A professional can also guide you on proper form for exercises and determine when it’s safe to progress, minimizing the risk of re-injury.
Key Principles of At-Home Patellar Tendonitis Rehab
Successful home rehabilitation for patellar tendonitis hinges on several core principles that guide your progress and ensure safety. Adhering to these will optimize your recovery journey.
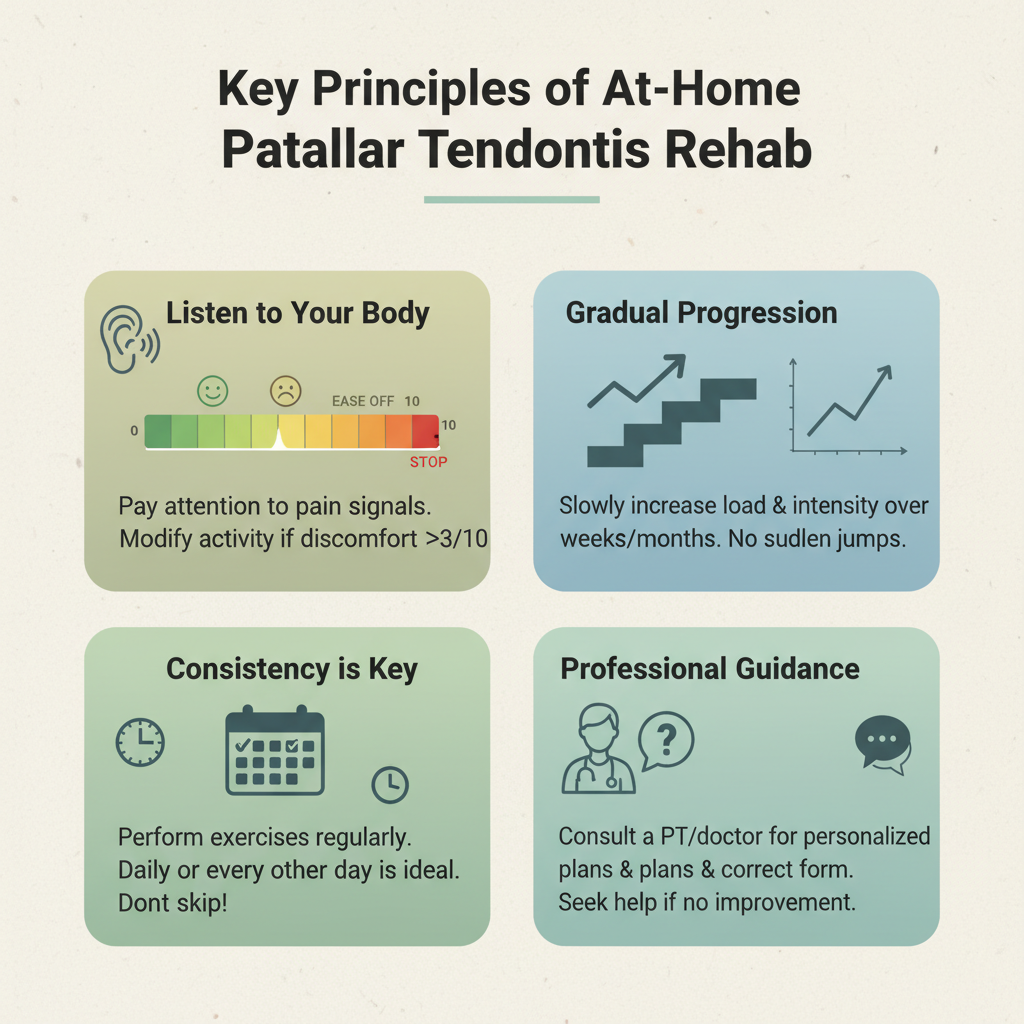
Listen to Your Body
Pain is your body’s alarm system. While some discomfort during rehab can be normal, sharp or increasing pain is a clear sign to back off, modify an exercise, or rest. Use a pain scale (0-10, where 0 is no pain and 10 is the worst imaginable pain) to monitor your symptoms. Aim to keep pain levels during and after exercises below a 3-4/10 and ensure pain doesn’t significantly worsen the next day.
Gradual Progression
Recovery from tendonitis is rarely linear and requires patience. The key is to gradually increase the intensity, duration, or resistance of your exercises over time. Rushing the process can lead to setbacks. Think of rehab as a marathon, not a sprint.
Consistency is Key
Just like building muscle, improving tendon health requires consistent effort. Aim to perform your exercises regularly, ideally 3-5 times a week, rather than sporadic intense sessions. Regularity reinforces positive adaptations in the tendon.
Phase 1: Acute Pain Management & Early Healing (Weeks 1-2)
The initial phase focuses on reducing pain and inflammation, allowing the tendon to begin its healing process. This period is about protecting the tendon and promoting gentle movement.
R.I.C.E. Protocol
- Rest: Avoid activities that aggravate your pain. This doesn’t mean complete inactivity, but rather modifying or temporarily stopping high-impact activities.
- Ice: Apply ice packs to the painful area for 15-20 minutes, 2-3 times a day, especially after activity or if swelling is present. Wrap the ice in a cloth to protect your skin.
- Compression: A compression bandage or knee sleeve can help reduce swelling and provide support, though ensure it’s not too tight.
- Elevation: Elevate your leg above your heart when resting to help reduce swelling.
Gentle Mobility & Isometrics
Once acute pain subsides slightly, introduce gentle, pain-free movements. Isometric exercises are excellent in this phase as they strengthen the muscle without moving the joint, minimizing stress on the tendon. Hold each contraction for 30-45 seconds, 3-5 repetitions, 2-3 times a day.
- Quadriceps Setting: Sit with your leg extended. Push the back of your knee into the floor, tightening your thigh muscle (quadriceps). Hold.
- Straight Leg Raises: Lie on your back, bend one knee, and keep the other leg straight. Tighten the thigh muscle of the straight leg and slowly lift it a few inches off the floor. Hold briefly, then lower.
- Wall Squat Hold (Isometric): Lean your back against a wall and slide down until your knees are bent at about 30-45 degrees (not 90 degrees initially). Hold this position, focusing on quadriceps engagement.
Phase 2: Strengthening & Progressive Loading (Weeks 2-6)
This is where the core rehabilitation work begins, focusing on gradually strengthening the patellar tendon and surrounding muscles. The cornerstone of patellar tendonitis rehab is eccentric loading.
Eccentric Exercises: The Gold Standard
Eccentric exercises involve lengthening a muscle under tension. For patellar tendonitis, these exercises are highly effective in stimulating tendon healing and improving its capacity to handle load. Perform 3 sets of 10-15 repetitions, 3-4 times per week, with a slow, controlled lowering phase (3-5 seconds).
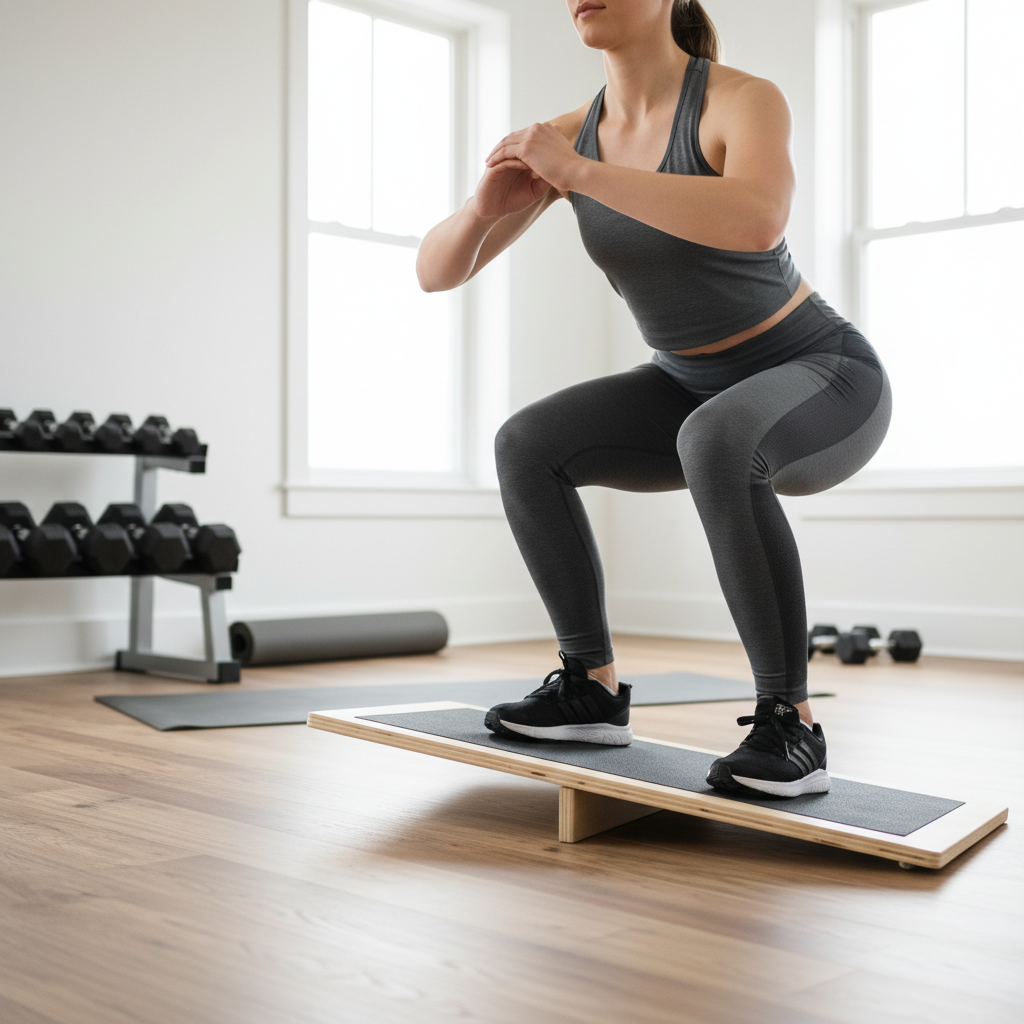
- Decline Squats: Stand on a slanted board (or place a book under your heels) with your feet shoulder-width apart. Slowly lower into a squat, taking 3-5 seconds to descend. Use your good leg to push back up, or stand up quickly to reset for the next repetition if pain is present on the upward phase.
- Single-Leg Decline Squats (Progression): Once two-legged decline squats are pain-free, progress to single-leg variations, maintaining slow eccentric control.
- Calf Raises (Eccentric): Stand on a step with your heels hanging off. Push up with both feet, then slowly lower one heel below the step over 3-5 seconds. Use both feet to push back up.
Quadriceps & Hamstring Strengthening
A strong quadriceps and balanced hamstring strength are essential for knee stability and proper movement mechanics. Aim for 3 sets of 10-15 repetitions.
- Leg Extensions (Bodyweight/Resistance Band): Sit on a chair. If using a resistance band, loop it around your ankle and the chair leg. Slowly straighten your leg.
- Hamstring Curls (Standing or Prone): Stand and slowly bend one knee, bringing your heel towards your glutes. Use a resistance band or small ankle weights for added challenge.
- Step-Ups: Step up onto a sturdy low box or step, focusing on driving through the heel. Slowly step back down.
Gluteal & Core Strengthening
Weak hips and core muscles can contribute to poor lower limb mechanics, placing undue stress on the patellar tendon. Incorporate these exercises for overall stability. Perform 3 sets of 12-15 repetitions.
- Glute Bridges: Lie on your back with knees bent, feet flat. Lift your hips off the floor until your body forms a straight line from shoulders to knees.
- Clamshells: Lie on your side with knees bent and stacked. Keeping your feet together, open your top knee like a clam shell.
- Plank: Hold a plank position, maintaining a straight line from head to heels, engaging your core. Start with 30-second holds and progress.
Phase 3: Return to Activity & Prevention (Weeks 6+)
This phase focuses on safely reintegrating into your desired activities while continuing to build strength and implement preventative measures.
Gradual Return to Sport/Activity
Do not jump back into full activity too soon. Gradually increase the intensity, duration, and frequency of your sport or activity. A good rule of thumb is the 10% rule: increase your activity level by no more than 10% per week. Monitor your pain closely during this transition.
Advanced Strengthening & Plyometrics (Caution!)
For athletes, plyometric exercises (jumping, hopping) are essential for returning to sport-specific demands. However, these are high-impact and should only be introduced when you are completely pain-free with basic strengthening and have a high tolerance for load. This is often best guided by a physical therapist.
- Box Jumps (Low Box): Jump onto a low box, landing softly. Step down to reset.
- Pogo Hops: Small, quick jumps on the balls of your feet, keeping knees slightly bent.
Maintenance & Prevention Strategies
- Warm-Up Properly: Before any activity, perform 5-10 minutes of light cardio and dynamic stretches.
- Cool-Down & Stretch: After activity, perform static stretches for your quadriceps, hamstrings, and calves. Hold each stretch for 30 seconds.
- Proper Footwear: Wear supportive shoes appropriate for your activity and replace them regularly.
- Manage Training Load: Avoid sudden spikes in training intensity or volume. Listen to your body and incorporate rest days.
- Nutrition & Hydration: Support tissue healing with a balanced diet rich in protein and micronutrients, and stay well-hydrated.
When to Seek Professional Help
While home rehabilitation is highly effective, there are times when professional intervention is necessary. Consult your doctor or physical therapist if:
- Your pain worsens or does not improve within a few weeks of consistent home exercise.
- You experience sharp, severe pain that limits daily activities.
- You notice swelling, redness, or warmth around the knee.
- You are unable to bear weight on your leg.
- You have any doubts about your symptoms or exercise technique.
Conclusion
Overcoming patellar tendonitis requires patience, consistency, and a structured approach. By diligently following these patellar tendonitis rehab protocols at home, you can effectively reduce pain, strengthen your tendon, and build resilience. Remember to always listen to your body, progress gradually, and don’t hesitate to seek professional guidance when needed. With dedication, you can return to your activities stronger and more confident than before.
