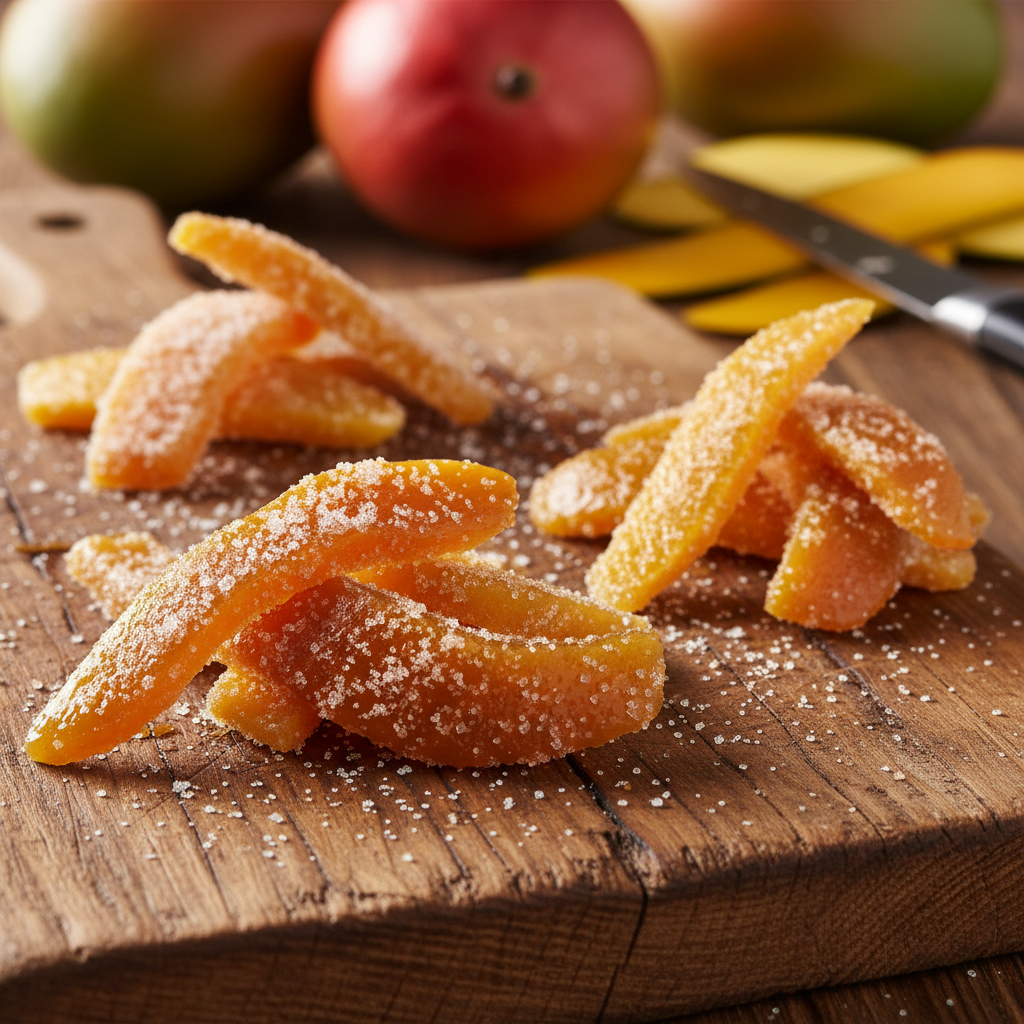
Ever found yourself staring at a pile of mango peels, feeling a pang of guilt as you toss them into the bin? I certainly have! For years, those vibrant, fragrant skins were just a byproduct of my mango obsession, destined for the compost heap. But what if I told you those very peels could be transformed into something utterly delicious, a sweet and tangy treat that’s surprisingly easy to make? Well, buckle up, because today I’m sharing my absolute favorite, tried-and-true recipe for mango peel candy – a delightful snack that turns waste into wonder!
My Journey: From Peel Purgatory to Candied Paradise
Like many home cooks, I’m always looking for ways to reduce food waste. My “aha!” moment with mango peels came during a particularly bountiful mango season. I had eaten so many fresh mangoes that the sight of the discarded peels started to weigh on me. I remembered seeing recipes for candied citrus peels, and a little lightbulb went off: why not mango peels?
My first attempts, I’ll admit, were… interesting. Some batches were too tough, others too bitter, and a few dissolved into a sugary mush. It was a journey of trial and error, adjusting cooking times, sugar ratios, and drying methods. But with each attempt, I learned a little more, until finally, I perfected a method that consistently produces irresistible, chewy, and perfectly balanced mango peel candy. And trust me, once you try these, you’ll never look at a mango peel the same way again!
Why Bother with Mango Peels?
Beyond the joy of creating something delicious from what would otherwise be discarded, there are some compelling reasons to give this recipe a go:
- Reduced Food Waste: This is the big one! By repurposing mango peels, you’re contributing to a more sustainable kitchen and reducing your environmental footprint.
- Nutritional Benefits: Believe it or not, mango peels are packed with fiber, antioxidants, and vitamins, including Vitamin A, C, and E. While candying them adds sugar, you’re still getting some of those good-for-you compounds.
- Unique Flavor and Texture: The candy offers a delightful chewiness and a concentrated mango flavor with a slight tangy edge that’s truly unique. It’s sweet, but not cloyingly so.
- Budget-Friendly: You’re using an ingredient you already have!
What You’ll Need: Gathering Your Tools and Ingredients
Before we dive into the delicious details, let’s make sure you have everything ready. You don’t need any fancy gadgets, just some basic kitchen essentials.
Ingredients:
- Peels from 3-4 ripe, firm mangoes (I prefer Ataulfo or Honey mangoes for their thier, less fibrous peels, but any variety works!)
- 2 cups granulated sugar (plus more for coating, optional)
- 1 cup water
- Optional: 1/2 teaspoon salt (helps to draw out bitterness and enhance flavor)
- Optional flavorings: A pinch of cayee pepper, 1/2 teaspoon ground ciamon, or zest of 1 lime (for an extra kick!)
Equipment:
- Sharp vegetable peeler or small knife
- Medium saucepan
- Slotted spoon or tongs
- Wire cooling rack
- Baking sheet lined with parchment paper or silicone mat
- Airtight container for storage
My Tried-and-True Method: Step-by-Step Candied Mango Peels
This is where the magic happens! Follow these steps, and you’ll be enjoying your homemade mango peel candy io time.
Step 1: Preparing the Peels
First things first, wash your mangoes thoroughly before peeling. We’re using the skin, so clean is key! After you’ve enjoyed the sweet flesh, carefully peel the mangoes. Try to get peels that aren’t too thick or too thin – about 1/8 to 1/4 inch is ideal. If your peels are quite thick, you might want to gently scrape off some of the ier, fleshy part to avoid them being too chewy. Cut the peels into strips about 1/4 to 1/2 inch wide and 1-2 inches long. Consistency in size helps them cook evenly.
Step 2: The Blanching Dance (Removing Bitterness)
This is a crucial step that helps remove any residual bitterness from the peels and softens them up. Place your prepared mango peels in the saucepan and cover them with water. Bring to a boil over medium-high heat, then reduce the heat and simmer for about 5-7 minutes. You’ll notice the water might change color – that’s the bitterness seeping out! Drain the peels thoroughly using a colander. For an even milder flavor, you can repeat this step once more with fresh water, but I usually find one blanch is sufficient.
Step 3: Simmering in Sweetness
Return the blanched peels to the clean saucepan. Add 2 cups of granulated sugar and 1 cup of water to the pan. If you’re adding salt or other spices like ciamon, now’s the time to stir them in. Bring the mixture to a gentle boil over medium heat, stirring occasionally to dissolve the sugar. Once the sugar has dissolved, reduce the heat to low and let it simmer. This is where patience pays off!
You’ll need to simmer the peels in the syrup for about 45-60 minutes, or until the peels become translucent and the syrup thickens significantly. Stir occasionally to prevent sticking and ensure even cooking. The peels should look almost glass-like, absorbing all that sugary goodness.
Step 4: The Drying Game
Once your peels are translucent and the syrup is thick, remove the pan from the heat. Using a slotted spoon or tongs, carefully transfer the candied mango peels from the syrup onto your wire cooling rack. Make sure they are in a single layer and not touching each other too much. This allows for good air circulation.
Now, let them air dry! This can take anywhere from 12 to 24 hours, depending on your climate and humidity. I usually leave mine on the counter in a well-ventilated area. You’re looking for them to be dry to the touch and slightly firm, but still flexible. If you’re impatient or live in a very humid area, you can gently dry them in a very low oven (around 175°F/80°C) for an hour or two, checking frequently.
Step 5: The Optional Sugar Coating (My Favorite Finish!)
Once the peels are dry and slightly tacky, this is my favorite part – rolling them in sugar! Place some granulated sugar (and a pinch of cayee or lime zest if you like) in a shallow dish. Toss the dried mango peels in the sugar until they are lightly coated. This adds an extra layer of sweetness and prevents them from sticking together. The contrast of the sweet sugar with the tangy mango is just divine!
Tips for Perfection and Variations
- Choose Your Mangoes Wisely: While any mango works, I find that ripe but firm mangoes (not overly mushy) yield the best peels for candying. Varieties like Ataulfo, Honey, or Alphonso tend to have thier, less fibrous peels.
- Don’t Waste the Syrup! The leftover mango-infused syrup is liquid gold! Store it in a jar in the fridge. It’s fantastic in cocktails, iced tea, lemonade, or drizzled over pancakes and yogurt.
- Spice It Up: For a delightful kick, add a pinch of chili flakes or cayee pepper to your sugar coating, or even a star anise or cardamom pod to the simmering syrup.
- Citrusy Twist: Add the zest of an orange or lime to the syrup during simmering for a brighter, citrus-infused flavor.
- Storage: Once completely dry and coated, store your mango peel candy in an airtight container at room temperature for up to 2-3 weeks. They tend to get a bit softer over time, but are still delicious!
A Sweet End to Waste
And there you have it! A simple, satisfying, and utterly delicious way to give those often-discarded mango peels a second life. Not only are you creating a unique and tasty treat, but you’re also embracing a more sustainable approach to cooking, one peel at a time. The first time I shared these with friends, they couldn’t believe they were made from mango peels! Their surprised, delighted faces were all the confirmation I needed that this recipe is a wier.
So, the next time you’re enjoying a juicy mango, pause before you toss that peel. Give this recipe a try, and prepare to be amazed. Happy candying, and enjoy your sweet, sustainable snack!


