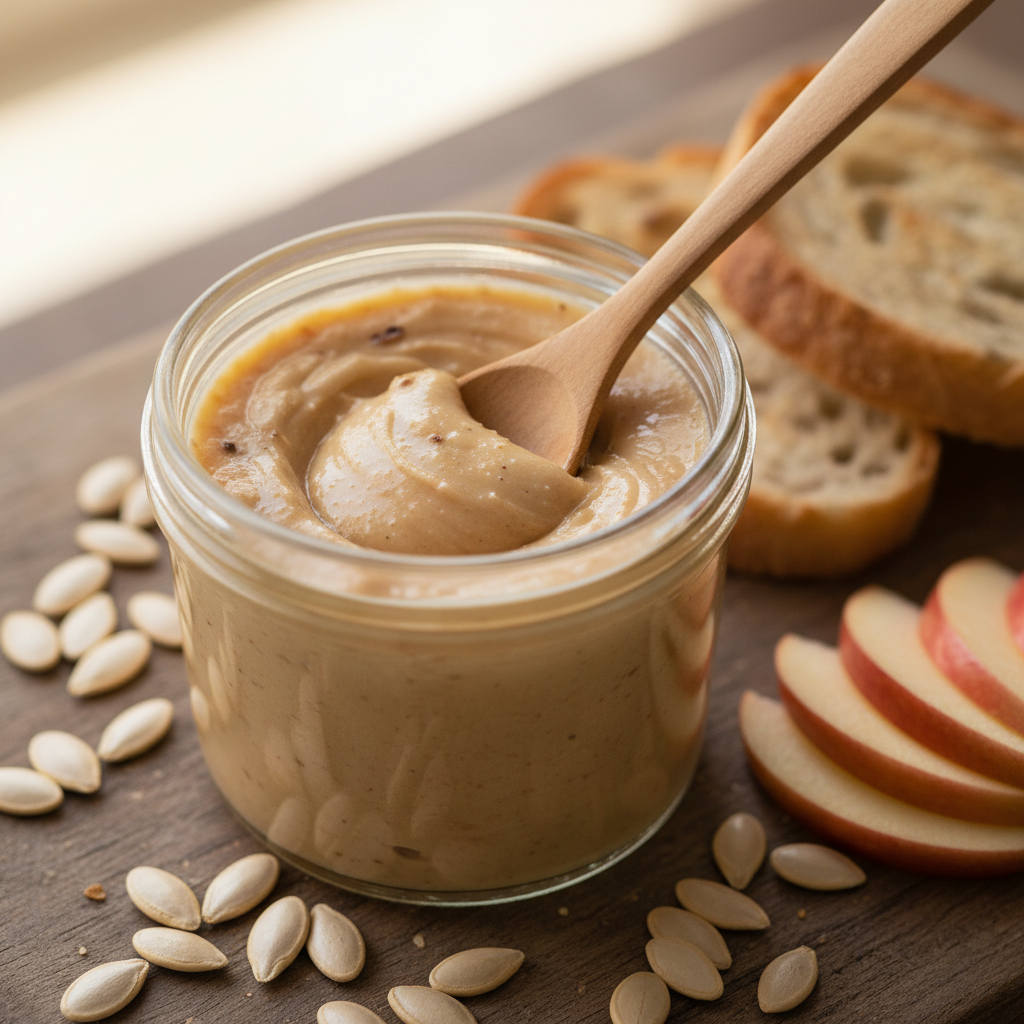
Hey there, fellow food adventurers! Are you constantly on the lookout for exciting new flavors, healthier alternatives, or perhaps a delicious spread that caters to dietary restrictions? If so, you’ve landed in just the right place. Today, we’re diving headfirst into the wonderful world of melon seed butter – a creamy, nutty, and absolutely delightful spread that’s about to become your new kitchen obsession. Forget your usual almond or peanut butter for a moment, because this underrated gem is here to steal the show!
I remember a time when my fridge was exclusively stocked with the “usual suspects” of nut butters. But a few years ago, after discovering a friend’s severe nut allergy, I started exploring alternatives. That’s when the idea of melon seed butter popped into my head. I mean, we eat pumpkin seeds, sunflower seeds, why not melon seeds? The initial experiment was… well, a bit messy, but oh-so-rewarding. The rich, earthy flavor and unbelievably smooth texture blew me away. It’s not just an allergy-friendly option; it’s a genuinely delicious one in its own right!
Making your own melon seed butter is not only incredibly satisfying but also allows you to control the ingredients, ensuring it’s free from unwanted additives and sugars. Plus, it’s surprisingly simple. So, let’s roll up our sleeves and get started on this fantastic culinary journey!
Why Melon Seeds? The Underestimated Powerhouse
Before we jump into the “how-to,” let’s chat about “why.” Why melon seeds? Well, for starters, they’re a fantastic, often overlooked source of nutrition. These tiny seeds are packed with:
- Protein: Great for muscle repair and satiety.
- Healthy Fats: Including monounsaturated and polyunsaturated fats, which are good for heart health.
- Vitamins and Minerals: Think magnesium, zinc, iron, and B vitamins, all crucial for various bodily functions. Magnesium, in particular, is often called the “relaxation mineral,” helping with sleep and stress!
- Fiber: Aids in digestion and keeps you feeling full.
But beyond the nutritional punch, melon seeds offer a unique flavor profile – slightly earthy, subtly sweet, and wonderfully rich. And here’s the kicker: they’re naturally nut-free! This makes melon seed butter an absolute lifesaver for those with nut allergies or sensitivities, allowing them to enjoy a creamy spread without worry. It’s truly a win-win.
My Journey to Melon Seed Butter: A Personal Revelation
My first foray into homemade seed butter began out of necessity and a touch of adventurous spirit. I had just finished a juicy cantaloupe and was about to toss the seeds when a thought struck me: “What if?” I’d seen recipes for pumpkin seed butter, so why not melon seeds? The idea of creating something unique and wholesome from scratch was incredibly appealing. I collected and cleaned the seeds, roasted them (perhaps a little too enthusiastically the first time, resulting in slightly burnt edges – a learning curve!), and then, with bated breath, tossed them into my trusty food processor.
The process was fascinating. Initially, they just spun around, sounding like tiny pebbles in a blender. Then, they turned into a coarse meal, slowly releasing their oils. What seemed like an eternity (but was probably only 10-15 minutes) later, magic happened. The meal started to clump, then formed a thick paste, and finally, a smooth, luscious butter began to swirl around the blades. The aroma that filled my kitchen was incredible – warm, toasty, and inviting. That first taste was pure revelation: creamy, slightly sweet, with a wonderfully complex nutty flavor that didn’t taste exactly like nuts. It was entirely its own delicious thing. From that day on, my “nut-free” adventure turned into a regular habit, and I’ve been refining my melon seed butter recipe ever since.
Gather Your Tools: What You’ll Need
Making melon seed butter is quite straightforward, but having the right equipment makes all the difference. Here’s what you’ll want to have on hand:
- High-Speed Blender or Food Processor: This is non-negotiable! A powerful motor is key to breaking down the seeds and achieving that creamy consistency. A food processor often works best for butters as it can handle thicker consistencies without overheating as quickly as some blenders.
- Baking Sheet: For roasting your melon seeds.
- Parchment Paper or Silicone Mat: To prevent sticking and make cleanup easier.
- Spatula: Essential for scraping down the sides of your food processor bowl and getting every last bit of that delicious butter.
- Airtight Jar or Container: For storing your finished butter.
The Star Ingredient: Sourcing Your Melon Seeds
When it comes to melon seeds, you have a couple of options. You can absolutely use the seeds directly from your favorite melons (cantaloupe, honeydew, even watermelon, though watermelon seeds are usually black and harder). However, this requires a bit more effort:
- Cleaning: You’ll need to thoroughly rinse them to remove all the stringy melon flesh.
- Drying: Lay them out on a clean towel or paper towels for a day or two until completely dry, or use a dehydrator on a low setting. This step is crucial to prevent mold and ensure good roasting.
For convenience and consistent results, I often opt for pre-packaged, hulled melon seeds (sometimes called “egusi” seeds in African and Asian markets). These are readily available online or in specialty health food stores. They save you the cleaning and drying hassle and often yield a smoother butter due to being already hulled. Whichever you choose, ensure they are raw and unsalted.
The Magic Happens: Step-by-Step Melon Seed Butter Recipe
Alright, let’s get to the good stuff! Here’s how you can make your very own, incredibly delicious melon seed butter.
Ingredients:
- 2 cups (about 250g) raw, hulled melon seeds
- Pinch of sea salt (about 1/4 teaspoon, adjust to taste)
- 1-2 tablespoons neutral oil (like grapeseed, avocado, or coconut oil, optional, for extra creaminess/smoothness)
- Optional add-ins: 1-2 teaspoons maple syrup or agave nectar, 1/2 teaspoon vanilla extract, 1/4 teaspoon ciamon.
Instructions:
- Preheat & Prepare: Preheat your oven to 300°F (150°C). Spread the melon seeds in a single layer on a baking sheet lined with parchment paper.
- Roast for Flavor: Roast the seeds for 10-15 minutes, or until they are lightly golden and fragrant. Stir them once or twice to ensure even roasting. Keep a close eye on them, as seeds can burn quickly! Roasting is essential for developing that deep, nutty flavor. Let them cool completely.
- Process Time: Transfer the cooled, roasted melon seeds into your high-speed food processor. Add the pinch of sea salt.
- Blend, Scrape, Blend: Process the seeds. This is where patience comes in!
- Initially, they will turn into a coarse meal (after about 1-2 minutes).
- Keep processing, and they will start to clump together, forming a thick paste (after another 3-5 minutes).
- Continue blending. The natural oils will begin to release, and the paste will slowly transform into a smoother, creamier consistency. This can take anywhere from 8-15 minutes, depending on your food processor.
- Stop and scrape down the sides of the bowl frequently with your spatula to ensure everything is evenly processed.
- Achieve Desired Consistency: If your butter seems too thick or isn’t getting as smooth as you’d like, you can add 1-2 tablespoons of neutral oil, one tablespoon at a time, and continue processing. This usually helps it reach that perfectly spreadable texture.
- Flavor it Up (Optional): Once your butter is smooth, add any optional sweeteners (maple syrup, agave) or flavorings (vanilla extract, ciamon). Process for another 30 seconds to fully incorporate.
- Taste & Adjust: Give your melon seed butter a taste! Adjust salt or sweetness as needed.
- Store It: Transfer the finished melon seed butter to a clean, airtight jar or container.
Quick Tip: If your food processor starts to get very warm, give it a break for a few minutes to prevent overheating. It’s a workout for the machine!
Flavor Fun: Customizing Your Melon Seed Butter
The beauty of homemade spreads is the ability to customize them! Once you’ve mastered the basic recipe, feel free to get creative:
- Sweet Tooth: Stir in a tablespoon of cocoa powder for a chocolatey version.
- Spiced Delight: Add a pinch of nutmeg or cardamom for an exotic twist.
- Tropical Vibe: A tiny bit of coconut extract can add a lovely island flavor.
- Extra Creamy: A small amount of full-fat coconut milk (the thick cream from the top of the can) can also be blended in for an incredibly lush texture, though this will shorten its shelf life.
How to Enjoy Your Homemade Melon Seed Butter
Now that you’ve got this glorious jar of homemade melon seed butter, what do you do with it? The possibilities are endless!
- Classic Spreads: On toast, bagels, rice cakes, or English muffins.
- Breakfast Booster: Swirl it into your oatmeal, yogurt, or use it as a topping for pancakes and waffles.
- Smoothie Magic: Add a tablespoon to your morning smoothie for extra protein and creaminess.
- Fruit Dip: Serve it alongside apple slices, banana, or celery sticks for a healthy snack.
- Baking Brilliance: Substitute it for other nut butters in cookies, energy balls, or bars.
- Savory Swirls: Believe it or not, a little melon seed butter can add a unique creaminess to salad dressings or even certain sauces.
Storage:
Store your homemade melon seed butter in an airtight container in the refrigerator. It should stay fresh for up to 2-3 weeks. Over time, the natural oils may separate, so just give it a good stir before each use.
Conclusion: Your New Favorite Spread Awaits!
And there you have it – a truly unique, nutritious, and incredibly delicious homemade melon seed butter! It’s an adventure for your taste buds, a boon for those with allergies, and a testament to the simple joy of creating something wonderful from scratch. My own experience taught me that sometimes the most unexpected ingredients hold the greatest culinary surprises. So, don’t hesitate! Gather your melon seeds, fire up that food processor, and prepare to be amazed. Your toast, your smoothies, and your snack cravings will thank you. Happy butter making!


