Hey there, fellow busy bee! Are you constantly juggling work, family, social life, and that ever-elusive dream of “eating healthy”? I hear you. For years, my lunch routine was a chaotic mess of last-minute decisions, often leading to expensive takeout or sad, deflated sandwiches. I longed for those vibrant, nutritious salads I saw on social media, but the thought of making one every single day felt like another item on an already overflowing to-do list. Sound familiar?
That was until I discovered the magic of meal prep salads. No, I’m not talking about soggy greens or bland toppings. I’m talking about delicious, fresh, and satisfying salads that take mere minutes to grab from the fridge and genuinely make you look forward to lunchtime. This isn’t just a recipe; it’s a game-changer, a mental health hack, and honestly, a budget-saver rolled into one. I’ve been doing this for years, and it has transformed my weekdays. Let me show you how it can transform yours too.
Why Meal Prep Salads Are Your New Best Friend
Before we dive into the nitty-gritty, let’s talk about *why* this works so well. For me, the biggest win is the sheer amount of time it saves. Imagine Sunday afternoon: you spend about an hour prepping, and suddenly you have 4-5 healthy, delicious lunches ready to go for the entire week. No more scrambling in the morning, no more decision fatigue at noon, and definitely no more impulse ordering that extra-greasy burger.
Beyond time, there are other huge benefits:
- Cost-Effective: Buying ingredients in bulk and making your own lunch is significantly cheaper than daily takeout.
- Healthier Choices: You control every ingredient, from the quality of the greens to the amount of dressing. No hidden sugars or excessive sodium here!
- Reduces Stress: Having a healthy meal waiting for you removes a significant mental load during a busy workday. It’s one less thing to worry about.
- Portion Control: When you prep your meals, you naturally become more mindful of portion sizes, which can be great for managing weight or just feeling better.
I remember the first time I prepped five salads. Monday came, and I just grabbed a jar. Tuesday, same thing. By Friday, I felt like a productivity superhero. The relief was palpable, and I’ve been hooked ever since.
The Golden Rule: Layering is Key (and Why It Matters!)
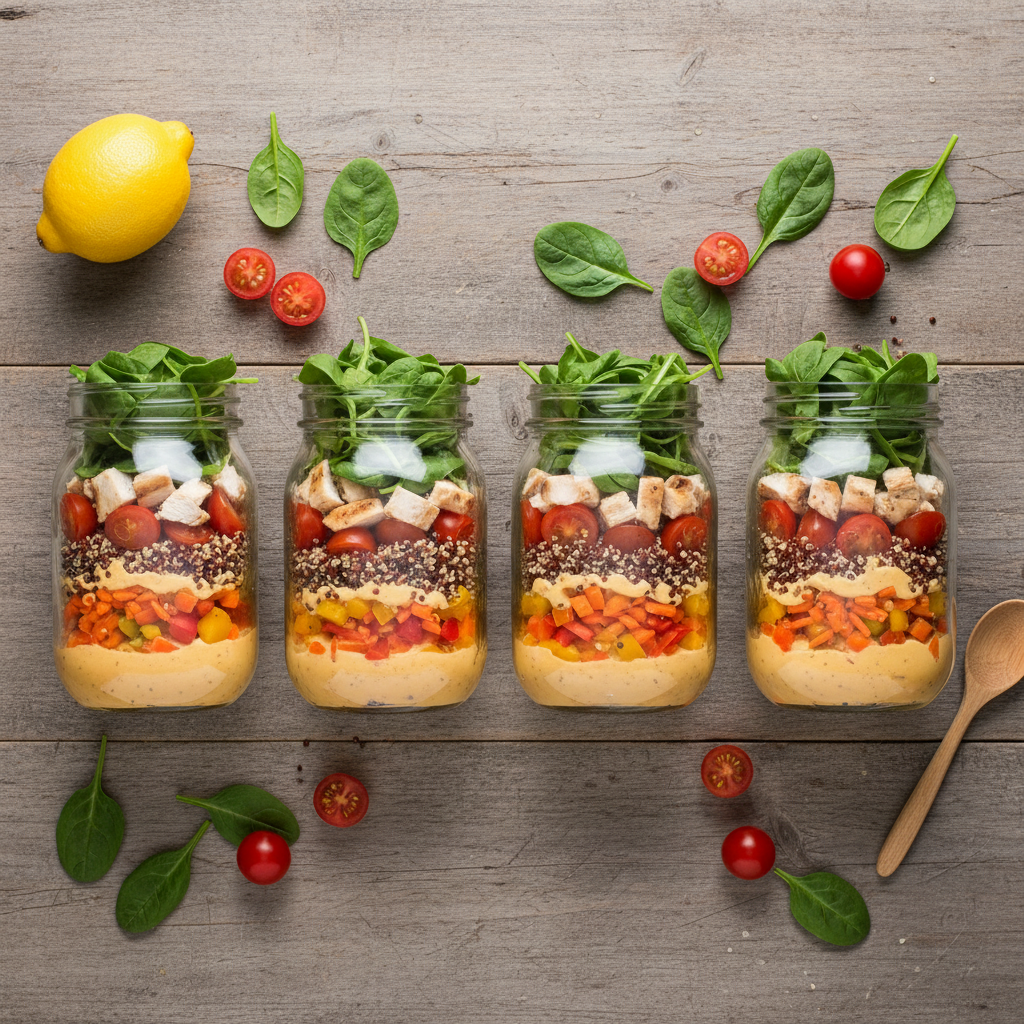
The secret to a non-soggy, delicious meal prep salad lies in one simple principle: layering. Think of it like building an architectural masterpiece in a jar. You want the wettest, hardest ingredients at the bottom, and the most delicate ones at the very top. This prevents your beautiful greens from wilting into a sad, soggy mess by Wednesday. Trust me, I learned this the hard way!
Here’s the basic blueprint:
- Dressing: Goes at the very bottom.
- Hardy Vegetables & Grains: Things that can marinate a bit and won’t get mushy.
- Proteins: Your chicken, beans, tofu – usually the layer above grains.
- Softer Vegetables & Fruits: Things that are a bit more delicate but not super fragile.
- Greens: The glorious leafy crown, nestled on top, safe from the dressing.
When you’re ready to eat, simply shake the jar (or pour it into a bowl and mix), and everything combines perfectly, with fresh, crisp greens!
My Go-To “Busy Bee” Salad Jar Recipe
This is my staple, the one I come back to again and again because it’s endlessly customizable and always delicious. You can easily adapt it based on what you have in your fridge or what’s in season.
What You’ll Need (Makes 4-5 Salads):
- 4-5 wide-mouth quart-sized Mason jars (or any airtight containers)
- For the Dressing (make a batch):
- ½ cup olive oil
- ¼ cup apple cider vinegar (or red wine vinegar)
- 1 tbsp Dijon mustard
- 1 clove garlic, minced (optional)
- 1 tsp honey or maple syrup (optional, for a touch of sweetness)
- Salt and black pepper to taste
- For the Layers (adjust quantities as needed):
- Hardy Veggies: 1 cup chopped carrots, 1 cup chopped bell peppers (any color), 1 cup cucumber (peeled, if desired, and chopped)
- Grains: 1 cup cooked quinoa or farro (cook according to package directions)
- Protein: 2 cups cooked chicken breast (shredded or diced), OR 1 can (15 oz) chickpeas (rinsed and drained), OR 1 block (14 oz) firm tofu (pressed, cubed, and baked/pan-fried)
- Softer Veggies/Fruits: 1 cup cherry tomatoes (halved), ½ cup corn (caed, frozen, or fresh)
- Greens: 5-6 cups mixed greens, spinach, or chopped romaine
- Optional Toppings (add right before eating): ¼ cup chopped nuts/seeds, ¼ cup crumbled feta or goat cheese, avocado slices.
Assembly Instructions (The Magic Part!):
- Start with the Dressing (2-3 tbsp per jar): Pour your dressing into the very bottom of each clean Mason jar.
- Add Hardy Vegetables (½ cup per jar): Layer the chopped carrots, bell peppers, and cucumber on top of the dressing. These can “marinate” a bit without getting mushy.
- Introduce Grains (¼ cup per jar): Next, add your cooked quinoa or farro. This creates another barrier and adds substance.
- Pile on the Protein (½ cup per jar): Add your chosen protein – cooked chicken, chickpeas, or tofu. This is what keeps you full and satisfied.
- Layer Softer Veggies/Fruits (¼ cup per jar): Now, add the cherry tomatoes and corn. These are still sturdy enough not to get soggy quickly.
- Top with Greens (1-1.5 cups per jar): Gently stuff your mixed greens or spinach into the top of the jar. Pack them in loosely so they don’t get bruised.
- Seal and Store: Screw on the lids tightly. Store your beautiful salad jars upright in the refrigerator for up to 4-5 days.
Pro Tips for Salad Prep Success
Over the years, I’ve picked up a few tricks that make this whole process even smoother:
- Batch Cook: On your prep day, cook a big batch of grains (quinoa, farro, brown rice) and your chosen protein (chicken, hard-boiled eggs, roasted chickpeas). This is the biggest time-saver.
- Wash & Chop All at Once: Get all your veggies washed, dried, and chopped in one go. Store any extra in separate containers for other meals or snacks.
- Invest in Good Jars: Wide-mouth quart-sized Mason jars are ideal because they’re easy to fill and easy to eat from (or pour out of).
- Vary Your Dressings: Don’t get stuck in a rut! Try different vinaigrettes, or a creamy Greek yogurt-based dressing. This keeps things exciting.
- Theme Your Salads: Think “Mediterranean,” “Asiaoodle,” “Southwestern.” This helps you choose complementary ingredients and prevents boredom.
- Keep Crunch Separate: If you love nuts, seeds, or croutons, add them *right before* you eat your salad to maintain their crispness. Same goes for delicate items like avocado (slice and add fresh!).
- Label Your Jars: Especially if you’re making different kinds of salads, a quick label with the date helps keep track.
Troubleshooting Common Salad Prep Problems
Even with the best intentions, things can sometimes go awry. Here’s how I tackle common issues:
- Soggy Greens: This is almost always due to incorrect layering or not drying your greens thoroughly enough. Make sure the dressing is at the very bottom and greens are at the very top, and spin/pat your greens dry!
- Boring Salads: If your salads are tasting a bit blah, it’s time to shake things up. Experiment with new spices on your protein, different types of cheese, or unexpected fruits like berries or mandarins. A different dressing can make a world of difference too.
- Ruing Out of Ingredients: Plan your grocery list around your weekly meal prep. If you know you’ll need five salads, make sure you buy enough ingredients for five portions of each layer.
Ready to Revolutionize Your Lunch?
Embracing meal prep salads has genuinely made my weekdays smoother, my eating habits healthier, and my wallet happier. It’s a small investment of time on the weekend that pays dividends throughout the week, offering a sense of calm and control over one of the most important aspects of your daily routine – your nutrition.
So, grab some jars, hit the grocery store, and give this a try. You might just find that this “busy bee” salad hack becomes your new favorite way to stay nourished and energized, no matter how packed your schedule gets. Happy prepping!


