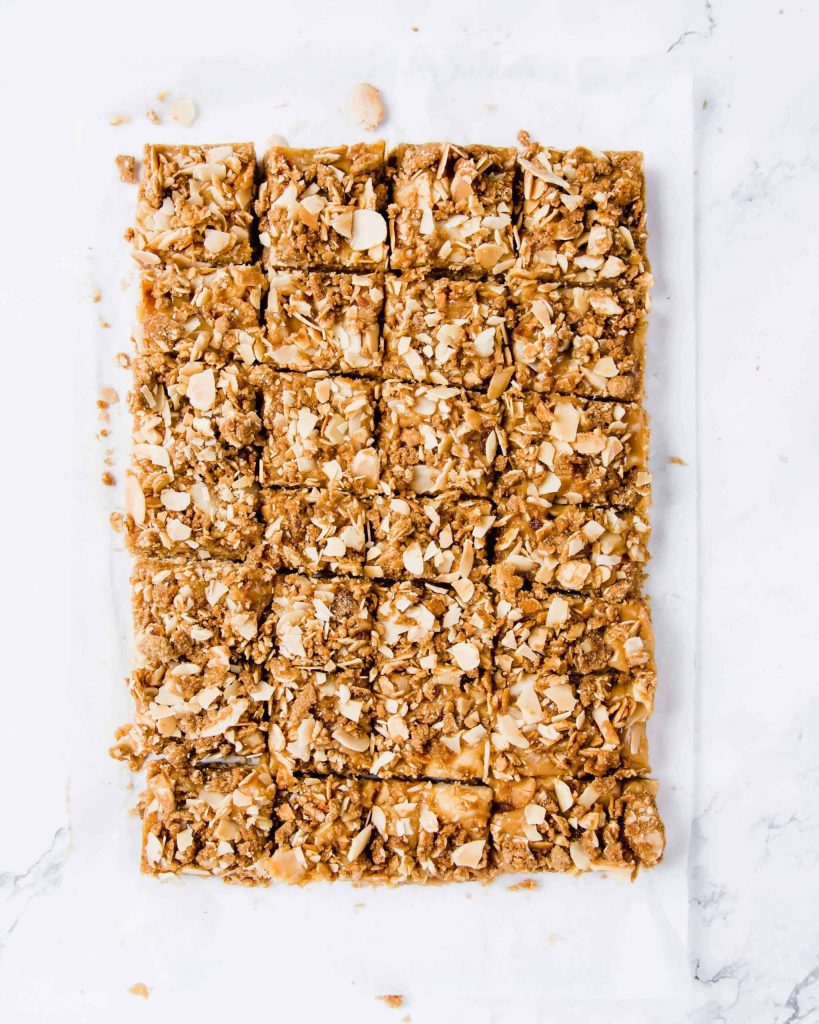

The Ultimate Indulgence: Why Salted Caramel Rice Krispie Bars Are Your New Obsession
There are few treats as universally beloved and nostalgically comforting as the classic Rice Krispie Treat. That familiar “snap, crackle, pop” transformed into a delightfully chewy, marshmallow-bound bar holds a special place in the hearts of adults and children alike. It’s a no-bake wonder, a quintessential bake sale star, and a go-to for quick, easy sweetness. But what if we told you that this beloved childhood staple could be elevated, transformed into a sophisticated, intensely flavorful dessert that appeals to a more refined palate, while still retaining all its playful charm?
Enter the Salted Caramel Rice Krispie Bar – a luxurious, utterly irresistible evolution of the original. This isn’t just a simple addition of caramel; it’s a meticulously crafted symphony of rich, buttery caramel, gooey marshmallow, perfectly crispy cereal, and that crucial sprinkle of flaky sea salt that cuts through the sweetness, creating a balance so addictive it’s almost dangerous. If you thought Rice Krispie Treats were just for kids, prepare to have your mind, and your taste buds, completely blown by this gourmet, yet deceptively simple, masterpiece. This bar is poised to become your new favorite obsession, a truly decadent indulgence that brings sophisticated flavor to a beloved classic.

The Enduring Allure of the Rice Krispie Treat: A Nostalgic Foundation
The story of the Rice Krispie Treat is one of happy accidents and enduring popularity. Created in 1939 by Kellogg Company employees Mildred Day and Malitta Jensen in the Kellogg kitchens in Battle Creek, Michigan, as a promotional vehicle for their newly introduced Rice Krispies cereal, these “marshmallow squares” quickly became a sensation. The original recipe, remarkably simple, involved just three ingredients: butter, marshmallows, and Rice Krispies cereal. Its no-bake nature, ease of preparation, and universal appeal ensured its place in American culinary history, with the recipe famously appearing on cereal boxes by 1941.
The charm of the original lies in its simplicity. It’s light, airy, and delivers that satisfying crispy-chewy texture. However, for those seeking a more complex flavor profile, the classic can sometimes feel a bit one-note in its sweetness. This is precisely where the Salted Caramel Rice Krispie Bar steps in, taking that cherished foundation and building upon it with layers of rich, sophisticated flavor, transforming it into a treat that appeals to every generation. It retains the beloved texture but elevates the taste to an entirely new level.
The Golden Touch: The Allure of Caramel
Caramel, in its essence, is simply caramelized sugar, often enriched with butter and cream. But its culinary impact is anything but simple. It’s a flavor that evokes warmth, comfort, and a luxurious sweetness, with notes ranging from buttery and nutty to deep, almost smoky undertones depending on how dark the sugar is caramelized.
In our Salted Caramel Rice Krispie Bars, the caramel component is not merely a drizzle; it’s intricately woven into the very fabric of the bar. It replaces a portion of the traditional butter-marshmallow binder, infusing every nook and cranny of the crispy cereal with its rich, golden goodness. This means that instead of just a marshmallow sweetness, you get a complex, buttery, and deeply satisfying caramel flavor that permeates every bite.
There are generally two main approaches to incorporating caramel into these bars:
- Homemade Caramel Binder: This method involves cooking butter, brown sugar, and heavy cream together until a thick, rich caramel sauce forms. This warm caramel is then often combined with melted marshmallows before being folded into the cereal. This approach ensures maximum caramel flavor and control over consistency. Using brown sugar adds a deeper molasses note to the caramel, enhancing its complexity.
- Melted Caramels: Utilizing pre-made soft caramel candies (like Kraft caramels) melted down with butter and sometimes a touch of condensed milk or cream. This offers a quicker route to caramel flavor, especially for those who prefer not to make caramel from scratch.
Regardless of the method, the goal is a soft, pliable caramel. Overcooking the caramel can lead to a harder bar, so maintaining a gentle heat and not boiling excessively is key to achieving that perfectly chewy texture that defines a great Rice Krispie bar. The caramel not only adds flavor but also contributes to an even gooier, more substantial bar compared to the original, making it feel truly decadent.
The Balancing Act: The Magic of Salt
What truly sets Salted Caramel Rice Krispie Bars apart and elevates them from simply “caramel” to “salted caramel” is the strategic addition of flaky sea salt. This is more than just a seasoning; it’s a flavor enhancer, a counterpoint, and a revelation.
When salt is paired with sweet, something magical happens. The salt doesn’t just make the sweet taste less sweet; it actually amplifies and intensifies the underlying flavors. In the case of caramel, salt deepens its buttery notes, highlights its rich caramelized sugars, and prevents the overall flavor from becoming cloyingly sweet. It creates a dynamic tension on the palate – that irresistible push and pull between sweet and savory that makes these bars utterly addictive.
For this application, flaky sea salt (such as Maldon or fleur de sel) is paramount. Unlike fine table salt, flaky sea salt provides bursts of briny crunch that melt slowly on the tongue, delivering pockets of intense saltiness that perfectly cut through the richness of the caramel and marshmallow. A final sprinkle of these beautiful salt flakes over the top of the set bars not only adds visual appeal but also ensures you get that crucial hit of salt with every bite. It transforms a simple dessert into a sophisticated, crave-worthy treat that appeals to adults and children alike. The contrast is what makes the experience so memorable and satisfying.
The Other Players: Marshmallows and Crispy Cereal
While caramel and salt are the stars of this elevated treat, the foundational elements of the classic Rice Krispie Bar remain crucial to its success:
- Mini Marshmallows: These are the binder, the goo, the elasticity that holds everything together. Mini marshmallows melt more quickly and evenly than larger ones, ensuring a smooth, cohesive mixture. Their inherent sweetness provides the classic backdrop against which the salted caramel can truly shine. They create that delightful chew that is synonymous with Rice Krispie treats.
- Crispy Rice Cereal: The “Krispies” themselves are essential for that iconic “snap, crackle, pop” and the light, airy crunch. Using fresh cereal is important to ensure maximum crispness. The cereal provides the necessary bulk and texture, balancing the richness of the caramel and marshmallows, preventing the bars from becoming too dense or overly chewy.
The beauty of these bars lies in their no-bake nature. This means minimal cooking time, usually just melting the butter, creating the caramel, and combining everything quickly. The simplicity makes them a perfect last-minute dessert, a fun activity with kids, or a quick treat to whip up for an unexpected guest.
Crafting the Perfect Bar: Tips for Success
To ensure your Salted Caramel Rice Krispie Bars achieve their full potential – intensely flavorful, perfectly chewy, and delightfully crispy – keep these tips in mind:
- Use a Large Pot: The mixture expands considerably, and you need ample space to stir the cereal without making a mess.
- Low and Slow for Caramel: When making your caramel, especially if from scratch, keep the heat medium-low. Boiling it too vigorously can lead to a hard caramel, which will result in hard bars. You want a soft, pourable consistency.
- Melt Marshmallows Off Heat (or on very low): Once the caramel is ready, remove it from the heat or reduce to very low before stirring in the marshmallows. The residual heat will melt them gently, ensuring a super gooey consistency without burning them.
- Work Quickly: Once the marshmallow-caramel mixture is combined with the cereal, it starts to set relatively quickly. Have your prepared pan (lined with parchment paper for easy removal!) ready to go.
- Gentle Pressing: When pressing the mixture into the pan, be gentle! Don’t pack it down too firmly. A light, even press will result in a more tender, chewy bar. Over-compressing can make the bars dense and hard. Using buttered hands or a piece of greased parchment paper can prevent sticking.
- Cooling Time: Allow the bars to cool completely at room temperature before cutting. This ensures they set properly and maintain their shape. For an even chewier, firmer bar (as some prefer), refrigerating them after cooling can be a delightful twist.
- Storage: Store in an airtight container at room temperature for maximum freshness, or in the refrigerator for a firmer, chewier bite (especially due to the cream in the caramel).
Beyond the Bar: Versatility and Indulgence
Salted Caramel Rice Krispie Bars are more than just a dessert; they are a statement of sophisticated simplicity. They are perfect for:
- Elevated Dessert Tables: They look impressive and taste even better, making them a standout at parties or potlucks.
- A Gourmet Snack: A satisfying treat with a cup of coffee or tea, offering that perfect balance of sweet and salty.
- Holiday Baking: Their rich, comforting flavor makes them ideal for festive gatherings, adding a touch of elegance to a familiar favorite.
- A Thoughtful Gift: Individually wrapped, they make delightful edible gifts for friends, neighbors, or teachers.
The appeal of these bars lies in their ability to combine nostalgic comfort with sophisticated flavor. They evoke childhood memories while simultaneously offering a grown-up indulgence. The rich, buttery caramel melts in your mouth, followed by the satisfying crunch of the cereal and the burst of salt, creating a truly unforgettable bite. It’s an experience that transcends the ordinary, proving that sometimes, the simplest treats, when given a gourmet twist, can become the most memorable.
So, are you ready to rediscover the magic of Rice Krispie Treats, elevated to a level of deliciousness you never thought possible? Are you prepared to indulge in the perfect balance of sweet, salty, and incredibly chewy perfection? Your journey to the ultimate no-bake dessert starts now. Don’t just dream of the perfect bar – go make it! Your taste buds will thank you profusely.
✅ Quick Tips: Read the recipe in its entirety before you start cooking. This will help you understand the ingredients, steps, and timing involved, and allow you to prepare any necessary equipment or ingredients beforehand.
Salted Caramel Rice Krispie Bars
Description
Cheesy Vegan Pizza Beans is a delicious and satisfying vegan dish that is perfect for a quick dinner or a satisfying snack. Made with kidney beans, tomato sauce, and vegan cheese, this dish is packed with protein and flavor.
Ingredients
Instructions
-
Rinse and sort the kidney beans. Soak the beans in a large pot of water for at least 8 hours, or overnight.

-
Drain and rinse the beans. Place them in a large pot and cover with water. Bring to a boil, then reduce the heat to a simmer and cook for 1 hour, or until the beans are tender.
-
Preheat the oven to 375°F (190°C) 🔥.
-
Heat the olive oil in a large skillet over medium heat. Add the onion 🧅, bell pepper, and garlic 🧄, and cook for 5 minutes, or until the vegetables are tender.

-
Add the oregano, basil, salt 🧂, and black pepper, and stir to combine.
-
Add the tomato sauce 🍅 and cooked beans to the skillet and stir to combine.

-
Spread the bean mixture in an even layer on a baking sheet. Sprinkle the vegan cheese 🧀 shreds and vegan parmesan cheese on top.
-
Bake for 10-15 minutes 🕒, or until the cheese is melted and bubbly.
-
Serve hot ♨ and enjoy!

Nutrition Facts
Servings 1
- Amount Per Serving
- Calories 386kcal
- % Daily Value *
- Total Fat 16.7g26%
- Saturated Fat 2.4g12%
- Total Carbohydrate 56.5g19%
- Sugars 7.5g
- Protein 18.2g37%
- Vitamin A 302 IU
- Vitamin C 12 mg
- Calcium 135 mg
- Iron 7 mg
* Percent Daily Values are based on a 2,000 calorie diet. Your daily value may be higher or lower depending on your calorie needs.
Note
You can also use other types of beans in this recipe, such as black beans or pinto beans.
Feel free to get creative and add your favorite pizza toppings to the mix!