Understanding Carpal Tunnel Syndrome (CTS)
Carpal Tunnel Syndrome is a common condition that affects the hand and wrist. It occurs when the median nerve, which runs from your forearm into your hand, becomes compressed or squeezed at the wrist.
This compression happens within a narrow passageway in your wrist called the carpal tunnel. The tunnel is formed by bones and a strong ligament (the transverse carpal ligament) that runs across the top.

Common symptoms include numbness, tingling, and pain in the thumb, index finger, middle finger, and half of the ring finger. You might also experience weakness in the hand, making it difficult to grip objects.
Causes can range from repetitive hand and wrist movements to underlying medical conditions like diabetes, thyroid dysfunction, and arthritis. Pregnancy can also trigger temporary CTS symptoms.
The Science Behind Nerve Gliding: How It Works
Normally, nerves move freely and smoothly as our bodies move. They glide and slide through tissues and around joints, accommodating various postures and actions. In conditions like carpal tunnel syndrome, the median nerve can become irritated, inflamed, or even “stuck” due to surrounding swelling or adhesions within the carpal tunnel.
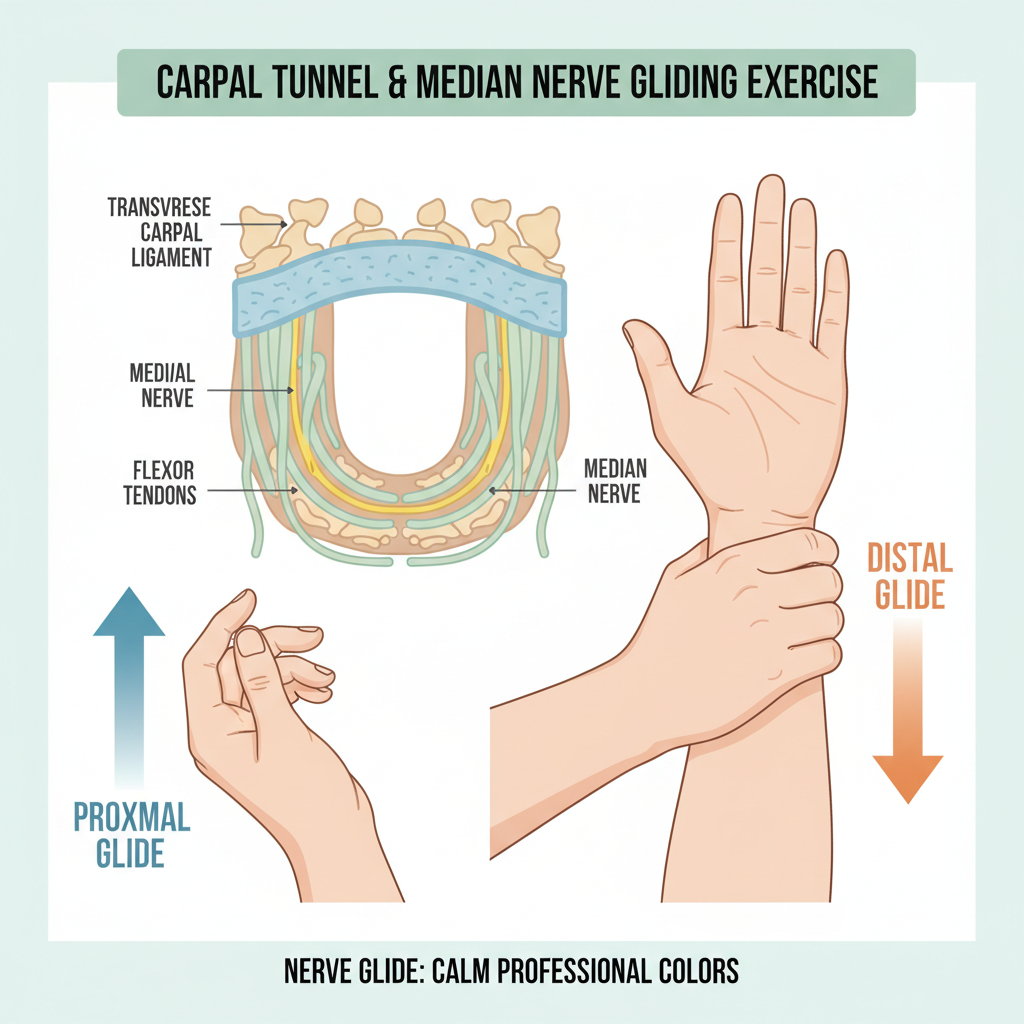
Nerve gliding exercises, also known as nerve flossing, are designed to gently mobilize the median nerve. By performing specific movements, you encourage the nerve to slide and stretch within its confined space, much like flossing between your teeth.
This gentle movement helps to reduce friction and irritation around the nerve, decrease swelling, and improve blood flow. Over time, regular nerve gliding can help break down adhesions and restore the nerve’s natural ability to move, leading to significant symptom improvement.
Benefits of Nerve Gliding Exercises for Carpal Tunnel Relief
Incorporating nerve gliding into your daily routine offers a multitude of benefits for managing carpal tunnel syndrome:
- Reduces Pain and Numbness: By decompressing and mobilizing the median nerve, these exercises directly address the source of your discomfort.
- Improves Nerve Mobility: They restore the natural gliding motion of the nerve, preventing it from getting trapped or irritated.
- Increases Circulation: Enhanced blood flow to the nerve and surrounding tissues aids in healing and reduces inflammation.
- Decreases Inflammation: Gentle movement can help flush out inflammatory substances from the carpal tunnel area.
- Non-Invasive and Self-Managed: Nerve glides offer a conservative treatment option that you can perform yourself, often delaying or even avoiding the need for more invasive treatments like surgery.
- Promotes Long-Term Nerve Health: Regular practice can contribute to overall nerve resilience and prevent recurrence of symptoms.
Who Can Benefit from Nerve Gliding Exercises?
Nerve gliding exercises are often recommended for individuals with mild to moderate carpal tunnel syndrome. They are an excellent option for those seeking non-surgical approaches to manage their symptoms.
People who spend long hours on computers, perform repetitive hand tasks, or experience early signs of CTS can use these exercises preventatively. They can also be a valuable part of a rehabilitation program after carpal tunnel surgery, always under the guidance of a therapist.
However, it is crucial to consult with a healthcare professional before starting any new exercise regimen, especially if your symptoms are severe or worsening.
Important Considerations Before You Start
While nerve gliding exercises are generally safe, proper technique and caution are key. Always prioritize safety and listen to your body.
- Consult a Professional: Before beginning, speak with your doctor, physical therapist, or occupational therapist. They can confirm your diagnosis and provide personalized guidance.
- Start Gently: Begin with fewer repetitions and less intensity. The goal is to feel a gentle stretch or tension, not pain.
- Avoid Pain: If an exercise causes increased pain, numbness, or tingling, stop immediately. You might be performing it incorrectly or it might not be suitable for your current condition.
- Consistency is Key: Regular, consistent practice yields the best results. Aim for short, frequent sessions rather than long, infrequent ones.
- Maintain Proper Posture: Good posture, especially in your neck and upper back, can impact nerve health all the way down to your hands.
Step-by-Step Nerve Gliding Exercises for Carpal Tunnel Syndrome
Here are some common nerve gliding exercises. Remember to perform each movement slowly and smoothly. Do not force any position.
Exercise 1: Basic Median Nerve Glide (Prayer Position)
This gentle exercise is a great starting point for improving median nerve mobility.
- Start with your elbows bent and your palms together in a “prayer” position, fingers pointing upwards, at chest height.
- Slowly lower your hands towards your waist, keeping your palms together and fingers pointing upwards. You should feel a gentle stretch in your wrists and forearms.
- Hold for 5-10 seconds, then return to the starting position.
- Repeat 5-10 times.
Exercise 2: Full Median Nerve Glide (Waiter’s Tip)
This exercise involves more movement through the shoulder and elbow to encourage a full nerve glide.
- Extend your arm straight out in front of you, palm facing up, as if you are about to receive a tray.
- Gently bend your wrist backward, pointing your fingers towards the floor.
- With your wrist bent, bend your elbow and bring your hand towards your shoulder, as if you are tipping a tray. You should feel a stretch from your wrist up to your shoulder.
- Hold for a few seconds, then slowly reverse the motion, extending your arm and relaxing your wrist.
- Repeat 5-10 times.
Exercise 3: Tabletop Nerve Glide
This exercise uses a stable surface to support your arm while gliding the nerve.
- Place your forearm on a table, palm facing up. Your hand should hang off the edge of the table.
- Gently let your hand drop towards the floor, allowing your fingers to relax.
- Then, slowly lift your hand and extend your wrist upwards, pointing your fingers towards the ceiling.
- Hold each position for a few seconds.
- Repeat 5-10 times.
Exercise 4: Finger-Pull Glide
This targets the nerve movement more directly through the fingers.
- Hold your affected hand out in front of you, palm facing away from you, fingers pointing down.
- Use your other hand to gently pull back the fingers of your affected hand towards your body, creating a stretch in your wrist and forearm.
- Hold for 10-15 seconds.
- Release and repeat 3-5 times.
How Often and How Long to Perform Nerve Glides
For optimal results, aim to perform these exercises 2-3 times a day. Each session can consist of 5-10 repetitions of each chosen exercise, holding the stretch or glide for a few seconds at the end range of motion.
The duration of practice varies, but many individuals report symptom improvement within a few weeks of consistent performance. Long-term adherence, even after symptoms subside, can help prevent recurrence.
Integrating Nerve Glides into Your Daily Routine
Make nerve gliding a natural part of your day. Perform them during short breaks at work, before and after activities that aggravate your symptoms, or as part of your morning and evening routines.
Combine these exercises with ergonomic adjustments at your workstation, such as proper keyboard and mouse placement, and regular stretching. This holistic approach significantly enhances their effectiveness.
Beyond Nerve Glides: Holistic Approaches to CTS Management
While nerve gliding exercises are highly effective, a comprehensive approach often yields the best results for carpal tunnel relief. Consider these additional strategies:
- Ergonomic Adjustments: Ensure your workstation is set up to promote neutral wrist posture.
- Wrist Splints: Wearing a splint at night can keep your wrist straight and prevent nerve compression during sleep.
- Activity Modification: Identify and modify activities that exacerbate your symptoms. Take frequent breaks during repetitive tasks.
- Stretching and Strengthening: Incorporate general stretches for the forearms, wrists, and fingers, along with light strengthening exercises as advised by a therapist.
- Anti-Inflammatory Strategies: A balanced diet, adequate hydration, and managing underlying inflammatory conditions can support nerve health.
- Cold or Heat Therapy: Applying ice packs can help reduce inflammation, while warm compresses may relax muscles.
When to Seek Further Medical Attention
While nerve gliding exercises can provide significant relief, it is essential to know when to seek further medical evaluation. If your symptoms worsen, you experience no improvement after several weeks of consistent exercise, or if you develop severe pain, significant muscle weakness, or a loss of sensation, consult your doctor immediately.
These could be signs of more severe nerve compression that may require additional medical interventions, such as medication, injections, or in some cases, surgery.
Conclusion
Nerve gliding exercises for carpal tunnel relief offer a powerful and accessible strategy to manage symptoms and improve your quality of life. By understanding how these exercises work and incorporating them consistently into your daily routine, you can promote median nerve health and find lasting comfort.
Always remember to approach these exercises with patience and consistency, and never hesitate to seek professional guidance from a healthcare provider to ensure they are the right solution for your specific needs.

