Hey there, fellow food adventurers! Have you ever stood in your kitchen, peeling a beautiful, ripe persimmon, and felt a tiny pang of guilt as the vibrant skins slipped into the compost bin? I know I have. For years, those thin, flavorful peels were just “waste.” But then, a thought sparked: what if these weren’t waste at all? What if they were an ingredient waiting to be discovered?
That little thought blossomed into one of my most cherished kitchen creations: persimmon skin jam. It’s a revelation, a testament to the idea that some of the best flavors are found in the most unexpected places. This isn’t just a recipe; it’s a journey into zero-waste cooking, a way to extract every last drop of goodness from a magnificent fruit. And trust me, the result is pure, golden magic in a jar – a jam that’s surprisingly complex, subtly sweet, and wonderfully aromatic. So, grab your peeler, because we’re about to turn those “scraps” into something truly extraordinary!
Why Persimmon Skin Jam? A Journey of Discovery (and Deliciousness!)
My journey to persimmon skin jam started with a simple observation: persimmon skins, especially from ripe Fuyu or well-softened Hachiya, are incredibly flavorful. They often carry a more concentrated essence of the fruit itself, sometimes with a delightful hint of spice or a deeper, more nuanced sweetness. Initially, I was just trying to be more mindful about food waste. I’d seen recipes for apple peel jelly, so why not persimmon?
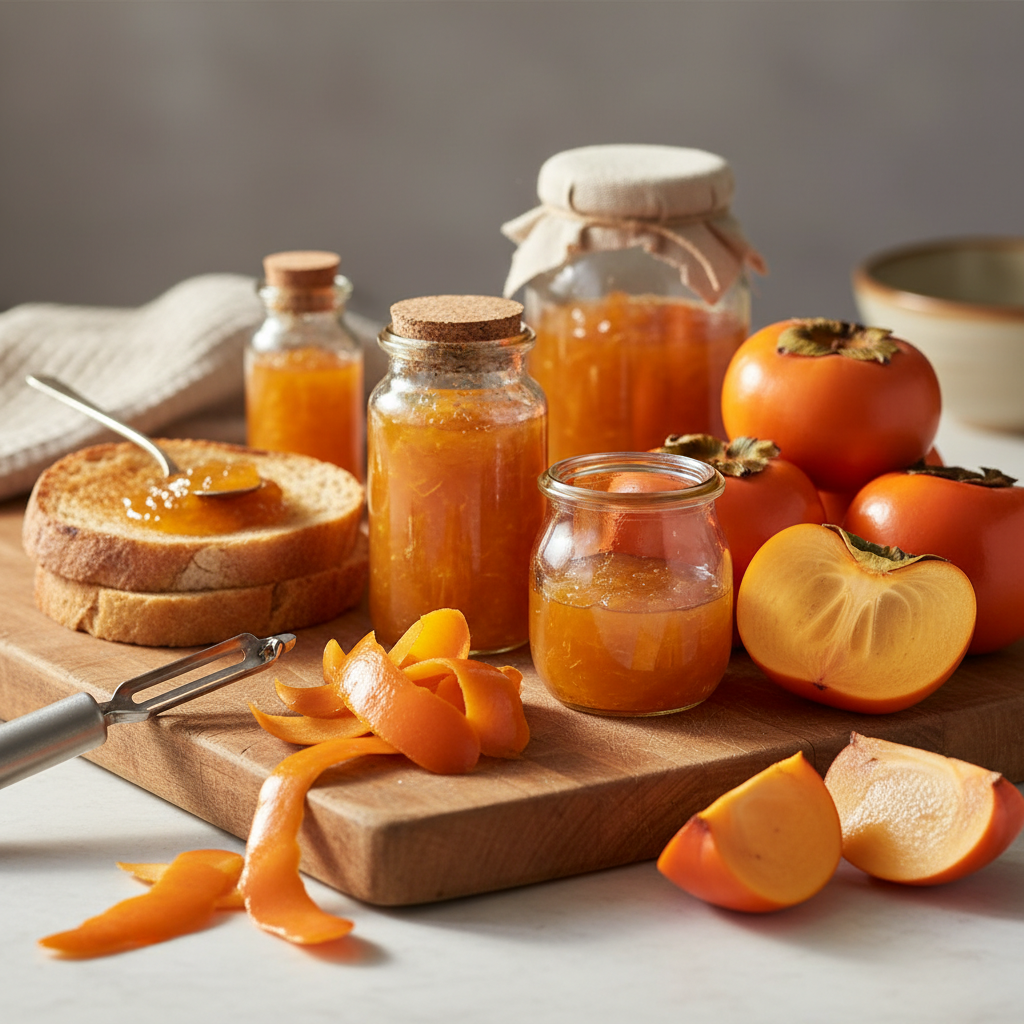
My first attempt was purely experimental. I gathered a bowl of skins, added some sugar and lemon juice, and hoped for the best. What emerged from that simmering pot was a thick, glistening jam with an amber hue that smelled like autumn itself. The flavor was incredible – a gentle sweetness, a unique persimmon tang, and a slight floral note I hadn’t anticipated. It wasn’t just “good for being made from skins”; it was genuinely delicious jam, full stop. Since then, it’s become a yearly ritual in my kitchen, a way to savor persimmon season long after the fresh fruit is gone.
Beyond the amazing taste, making this jam offers a wonderful sense of accomplishment. You’re not just cooking; you’re being resourceful, transforming something destined for the bin into a gourmet delight. Plus, persimmon skins, like the fruit itself, are packed with vitamins A and C, and fiber. So you’re not just getting flavor; you’re getting goodness too!
Choosing Your Persimmons: Hachiya vs. Fuyu & Ripeness is Key!
The success of your persimmon skin jam starts with the right persimmons. There are two main types you’ll typically encounter, and understanding them is crucial for skin quality:
- Fuyu Persimmons: These are the squat, tomato-shaped ones that you can eat firm, like an apple. Their skins are generally thier and less astringent, even when firm. For jam, I still prefer them when they’re very ripe and slightly soft, as the flavor intensifies and the skins are easier to work with.
- Hachiya Persimmons: These are the acorn-shaped persimmons that *must* be fully ripe and jelly-soft before eating, otherwise, they are incredibly astringent. If you’re using Hachiya skins, it’s absolutely vital that the fruit is so ripe it feels like a water balloon. Any hint of firmness, and those skins will impart a bitter, mouth-puckering quality to your jam that no amount of sugar can fix.
My personal preference? I lean towards Fuyu skins because they are consistently less challenging. However, if you have perfectly ripened Hachiyas, their skins offer a deeper, more complex flavor. Regardless of type, make sure your persimmons are organic or thoroughly washed, as you’ll be using the outermost layer of the fruit. Look for fruit that is free of blemishes, cuts, or soft spots that indicate spoilage.
Gathering Your Jam-Making Arsenal: What You’ll Need
Before we dive into the cooking, let’s make sure you have everything ready. This recipe doesn’t require any fancy equipment, just standard kitchen tools.
Ingredients:
- Skins from 8-10 medium-sized ripe persimmons (about 2 cups, lightly packed after chopping) – the riper, the better!
- 1 cup granulated sugar (adjust to taste, I sometimes go for ¾ cup if my persimmons are super sweet)
- 2 tablespoons fresh lemon juice (This is critical for balancing sweetness, adding brightness, and helping with pectin activation for setting)
- ½ cup water (or more, if your skins seem dry, or you want a slightly thier jam)
- Optional: ¼ teaspoon ground ciamon or a tiny pinch of nutmeg for an extra warm note.
Equipment:
- Vegetable peeler or a sharp paring knife
- Cutting board
- Small saucepan or a Dutch oven (preferably non-reactive, like stainless steel or enameled cast iron)
- Spatula or wooden spoon
- Potato masher or immersion blender (optional, for a smoother consistency)
- Clean glass jars with lids (I usually get 2-3 small jars, about 4-6 oz each)
- Ladle and fuel (for easy filling)
- Small plate chilled in the freezer (for testing the set of the jam)
My Tried-and-True Persimmon Skin Jam Recipe
Alright, let’s get to the good part! This process is straightforward and incredibly rewarding.
Step 1: Prep Your Persimmon Skins
- Thoroughly wash your persimmons under cool ruing water. Even if they’re organic, a good rinse is always a good idea.
- Carefully peel the persimmons using a vegetable peeler or a sharp paring knife. Try to get just the skin, avoiding too much of the flesh, but a little bit is perfectly fine.
- Once peeled, finely chop the skins. The finer you chop them, the smoother your jam will be, and the quicker they’ll break down. I usually aim for pieces no larger than a pinky nail. You should have about 2 cups once chopped.
Step 2: Combine and Macerate (Optional, but Recommended!)
- In your saucepan, combine the chopped persimmon skins, granulated sugar, and lemon juice.
- Give it a good stir. Now, here’s my little secret for better flavor and texture: let this mixture sit for at least 30 minutes, or even a few hours (covered, at room temperature). The sugar will draw out the natural juices from the skins, creating a lovely syrup and helping the skins soften for cooking. If you’re in a hurry, you can skip this, but I highly recommend it!
Step 3: Simmer to Perfection
- After macerating (or immediately if you skipped it), add the ½ cup of water to the pot.
- Place the saucepan over medium heat. Bring the mixture to a gentle boil, stirring occasionally to prevent sticking.
- Once boiling, reduce the heat to low and let it simmer. This is where the magic happens! Stir more frequently as it thickens.
- The skins will soften and begin to break down. This will take anywhere from 20 to 40 minutes, depending on the ripeness and thickness of your skins. You’ll notice the color deepen to a beautiful amber.
- If you prefer a smoother jam, use a potato masher to mash the skins as they cook, or carefully use an immersion blender for a few pulses once they’re soft. I like a slightly chunky texture, so I often just rely on stirring and mashing with my spoon.
- If using, stir in your optional ciamon or nutmeg during the last 10 minutes of cooking.
Step 4: Test for the Set
This is crucial for good jam!
- After about 20-30 minutes of simmering, when the jam looks thick and glossy, take your chilled plate from the freezer.
- Spoon a small amount of hot jam onto the cold plate. Let it sit for about 1 minute, then gently push it with your finger.
- If the jam wrinkles and holds its shape, it’s ready! If it’s still too ruy, continue to cook for another 5-10 minutes and retest. Remember, jam will thicken considerably as it cools.
Step 5: Jar It Up!
- Once the jam has reached your desired consistency, remove it from the heat.
- Carefully ladle the hot jam into your clean, warm jars, leaving about ¼ inch of headspace.
- Wipe the rims clean, secure the lids, and let the jars cool completely on your counter. As they cool, you might hear the satisfying “pop” of the lids sealing.
Beyond the Jar: Creative Ways to Enjoy Your Jam
Now that you have your precious jars of golden persimmon skin jam, the fun truly begins! Of course, it’s wonderful on a classic piece of toast or a warm scone, but don’t stop there:
- Yogurt & Granola: Swirl a spoonful into your morning yogurt or oatmeal with some crunchy granola for an autumnal breakfast.
- Cheese Board Star: Pair it with soft cheeses like brie or goat cheese, or a sharp cheddar on your next charcuterie board. The sweet and tangy notes are a fantastic counterpoint.
- Pancake & Waffle Topping: Move over maple syrup! This jam adds a unique twist to your breakfast favorites.
- Baking Brilliance: Use it as a filling for thumbprint cookies, tarts, or even as a glaze for a simple pound cake.
- Savory Pairing: Don’t be afraid to get adventurous! A dollop alongside roasted chicken or pork can add an unexpected layer of flavor.
- Gifting: Homemade jam makes for a thoughtful and delicious gift. Tie a ribbon around a jar, and you have a perfect present.
Storage and Longevity: Keeping Your Jam Fresh
For jars that have sealed properly, your persimmon skin jam will last for several months in a cool, dark pantry. Once opened, or for jars that didn’t seal, store them in the refrigerator and consume within 2-3 weeks. If you want to be extra safe with long-term storage, you can follow standard water bath caing procedures for jams, which typically involves processing filled jars in boiling water for about 10 minutes (always check current, reliable caing guidelines for precise times and methods).
Conclusion
There you have it – a recipe that transforms what many consider kitchen waste into a culinary treasure. Making this persimmon skin jam is more than just a recipe; it’s an act of mindfulness, a way to appreciate every part of the food we consume, and a delightful journey into unexpected flavors. The aroma that fills your kitchen, the beautiful color of the finished product, and most importantly, the incredible taste, will surely make this a seasonal favorite in your home too.
So, the next time you’re peeling persimmons, resist the urge to discard those skins. Give them a new purpose, and you might just discover your new favorite homemade jam. Happy cooking, and enjoy every golden, flavorful spoonful!
