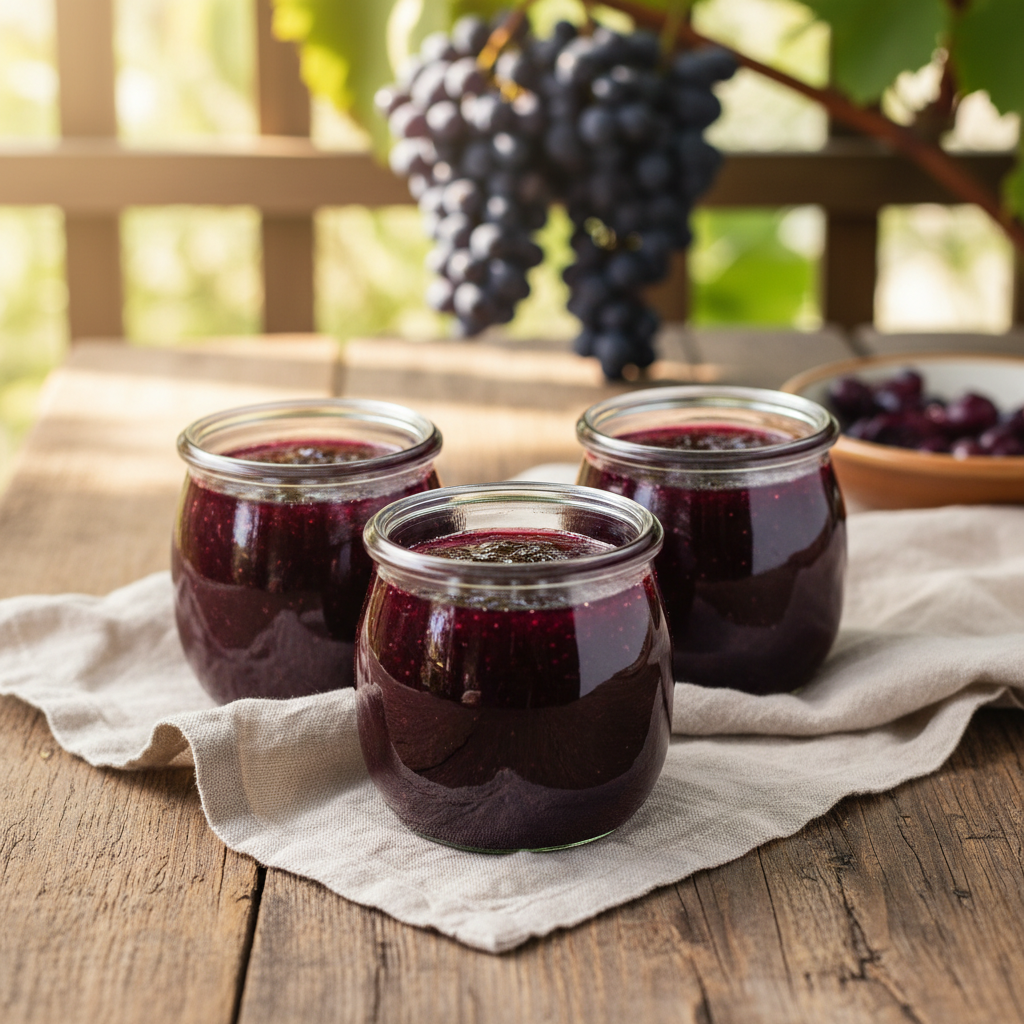
Ever found yourself with a big batch of grapes, maybe after making juice or a fruit salad, and wondered what to do with all those leftover skins? Most people just toss them, right? Well, let me tell you, you’re throwing away a little pot of gold! Today, I’m going to share a cherished family recipe for grape skin jelly that’s not only incredibly delicious but also a wonderful way to reduce food waste. It’s a recipe that takes something often overlooked and transforms it into a vibrant, sweet, and surprisingly flavorful spread that’s perfect on toast, with cheese, or even as a glaze.
My journey with grape skin jelly started years ago, watching my grandma in her bustling kitchen. She never let anything go to waste. After a long day of making grape juice for caing, there would be mountains of grape pulp – seeds and skins – left over. While the seeds often went to the compost, the skins were always set aside. “These,” she’d say with a twinkle in her eye, “are where the real flavor hides.” And oh, was she right! The first time I tasted that deep, concentrated grape flavor, coupled with a beautiful jewel-like color, I was hooked. It’s a taste that brings back childhood memories and a warmth that only homemade preserves can provide.
Why Grape Skins? The Unsung Hero of Jelly Making
You might be thinking, “Grape *skins*? Really?” Yes, really! Here’s the thing: grape skins are packed with flavor, color, and most importantly for jelly makers, natural pectin. Pectin is what gives jelly its set. While the pulp and juice contain some pectin, the skins are often a concentrated source, especially in varieties like Concord grapes. This means you get a robust, intense grape flavor that’s different from jelly made solely from the juice. It’s less sweet in a way, more complex, with a slight tang that elevates the whole experience. Plus, it’s an incredibly satisfying feeling to turn something that would otherwise be discarded into something so utterly delicious and beautiful. It’s like finding a hidden treasure in your kitchen!
Gathering Your Tools: What You’ll Need
Before we dive into the delicious details, let’s make sure you have everything ready. You don’t need fancy equipment, just a few kitchen essentials. Trust me, having everything laid out makes the process so much smoother and more enjoyable. It’s all about setting yourself up for success!
- Large stockpot or Dutch oven
- Strainer or colander
- Cheesecloth or a jelly bag (highly recommended for a clear jelly!)
- Large bowl for collecting juice
- Measuring cups and spoons
- Spatula or ladle
- Caing jars (pint or half-pint are ideal) with lids and bands
- Caing fuel (makes filling jars so much easier)
- Jar lifter
- Large pot for water bath caing (if you plan to store long-term)
- Clean towels
The “Magic” Ingredients: Simple & Sweet
The beauty of this recipe lies in its simplicity. You don’t need a long list of obscure ingredients. Just a few key players work together to create magic.
- Grape Skins: This is our star, of course! You’ll need about 6-8 cups of packed grape skins. This usually comes from about 4-5 pounds of grapes once they’ve been juiced or destemmed and peeled (if you’re making a seedless jam with the pulp). Don’t worry if there’s a little pulp still attached – it adds to the flavor.
- Water: About 4 cups, to help extract the pectin and flavor from the skins.
- Granulated Sugar: Roughly 3-4 cups, depending on the sweetness of your grapes and your personal preference. Sugar is not just for sweetness; it also helps with the jelly’s set and acts as a preservative.
- Lemon Juice: 2 tablespoons, freshly squeezed is best. This isn’t just for flavor; lemon juice (which is acidic) is crucial for helping the pectin in the grape skins activate and create a proper jelly set. Don’t skip it!
Step-by-Step: Crafting Your Grape Skin Jelly
Now for the fun part! This process might seem a little involved if you’re new to jelly making, but I promise it’s straightforward and incredibly rewarding. Just take it one step at a time, and don’t rush.
Prepping Your Grapes (and Skins!)
First, you need your grape skins. If you’ve just made grape juice, you’re all set! If you’re starting with whole grapes, you’ll need to separate the skins. My grandma used to do this by hand, popping the pulp out. If you’re using a juicer, the skins will likely be a byproduct. Give your skins a quick rinse if needed, but don’t over-rinse and wash away too much of that precious pectin. Measure out about 6-8 cups, loosely packed.
Extracting the Flavorful Nectar
Place your grape skins into a large stockpot. Add the 4 cups of water. Bring this mixture to a boil over medium-high heat, then reduce the heat to low, cover, and let it simmer gently for about 30-45 minutes. You want the skins to become very soft and the liquid to take on a deep, rich color. This simmering extracts all that wonderful flavor, color, and pectin from the skins. Stir occasionally to prevent sticking.
Once simmered, it’s time to separate the liquid. Set up your strainer or colander lined with several layers of cheesecloth (or use a jelly bag) over a large bowl. Carefully pour the grape skin mixture into the lined strainer. Let it drip undisturbed for at least 2-3 hours, or even overnight. Patience is key here! Resist the urge to squeeze the bag or press the skins, as this can make your jelly cloudy. You want a clear, beautiful jelly, so let gravity do its work.
Cooking Up the Jelly
Once you’ve collected all your beautiful grape skin liquid, measure it. You should have around 4-5 cups of liquid. If you have less, you can top it up with a little water to reach 4 cups, but try to use as much of the concentrated liquid as possible. Pour the measured liquid into a clean, large stockpot. Add the fresh lemon juice.
Now, add your sugar. A good starting point is 3 cups of sugar for 4 cups of liquid, but you can adjust based on the sweetness of your grapes and your taste. Stir continuously over medium-high heat until the sugar is completely dissolved. Once dissolved, bring the mixture to a rolling boil – a boil that can’t be stirred down. From this point, you’ll need to pay close attention.
Testing for the Perfect Set
This is where the magic happens, and a bit of a “feel” comes into play. You need to cook the jelly until it reaches the setting point. There are a few ways to test this:
- The Cold Plate Test: Place a small plate in the freezer before you start cooking. When you think the jelly might be ready, spoon a small amount onto the cold plate. Wait 30 seconds, then push it with your finger. If it wrinkles, it’s ready!
- The Sheeting Test: Dip a clean, cold metal spoon into the boiling jelly, then lift it and tilt it to let the jelly drip off. If the jelly forms two drops that run together and “sheet” off the spoon, it’s reached the setting point.
- Temperature Test (most reliable): Use a candy thermometer. Jelly sets around 220°F (104°C) at sea level. This is often the most foolproof method for begiers.
Be careful not to overcook, as this can lead to a very stiff or even gummy jelly. It’s a delicate balance!
Jarring Your Delicious Creation
While your jelly is cooking, prepare your jars. Wash jars, lids, and bands in hot soapy water and rinse well. To sterilize, place jars (without lids) in a boiling water bath caer, ensuring they are covered by at least an inch of water, and boil for 10 minutes. Keep them hot until ready to fill. Lids can be simmered in hot water (not boiling) according to manufacturer instructions, but do not boil them, as this can damage the sealing compound.
Once your jelly has reached its set point, carefully remove it from the heat. Skim off any foam that rises to the surface (a small amount of butter added during cooking can also help reduce foam). Using a caing fuel and a ladle, carefully fill the hot, sterilized jars, leaving about 1/4 inch of headspace. Wipe the rims of the jars clean with a damp cloth – this is crucial for a good seal. Place hot lids on the jars and screw on the bands until finger-tight.
If you plan to store your jelly for more than a few weeks, process the filled jars in a boiling water bath caer for 10 minutes (adjusting time for altitude if necessary). After processing, turn off the heat, remove the caer lid, and let the jars sit for 5 minutes before carefully removing them with a jar lifter. Place them on a clean towel on your counter, undisturbed, for 12-24 hours. You’ll hear the satisfying “ping!” as the lids seal. After 24 hours, check for seals (the lid should be concave and not flex when pressed). Any unsealed jars can be reprocessed or stored in the refrigerator and consumed within a few weeks.
Troubleshooting & Tips from My Kitchen
- Jelly Not Setting? Don’t despair! This happens to the best of us. It could be due to not enough pectin (from the skins or lemon juice) or not cooking it long enough. You can reprocess it. Pour the jelly back into the pot, add another tablespoon of lemon juice, and bring it back to a rolling boil, testing for set again. Sometimes, a little added commercial pectin can save it.
- Too Sweet/Not Sweet Enough? Always taste your grapes before you start. If they’re very tart, you might want to increase the sugar slightly. If they’re super sweet, you can reduce it a bit, but remember sugar also helps with the set.
- Cloudy Jelly? Usually caused by squeezing the jelly bag. Let it drip naturally for the clearest result. It still tastes great though!
- Don’t Be Afraid to Experiment: Once you’ve mastered the basic recipe, try adding a tiny pinch of ciamon or a star anise pod during the initial simmering of the skins for a unique twist!
Beyond the Toast: Ways to Enjoy Your Jelly
Of course, the classic way to enjoy this grape skin jelly is on a warm piece of toast, a scone, or a croissant. But don’t limit yourself! It’s fantastic with a cheese platter, especially with sharp cheddar or creamy brie. Use it as a glaze for roasted chicken or pork, or swirl it into plain yogurt for a quick, delicious breakfast. A spoonful melted and drizzled over vanilla ice cream is also an absolute treat. My grandma even used to spread it between layers of a simple yellow cake – talk about nostalgic perfection!
Conclusion
Making grape skin jelly is more than just a recipe; it’s an experience. It’s a journey from often-discarded grape skins to a jar of shimmering, flavorful goodness. It’s about respecting ingredients, reducing waste, and creating something truly special with your own hands. The aroma that fills your kitchen, the vibrant color, and that first taste of intensely grapey sweetness – it’s incredibly satisfying. So, the next time you have grape skins, remember my grandma’s wisdom. Don’t throw them away. Instead, turn them into this unforgettable grape skin jelly. You’ll not only be creating a delicious treat but also a little piece of culinary history right in your own home. Happy jelly making!
